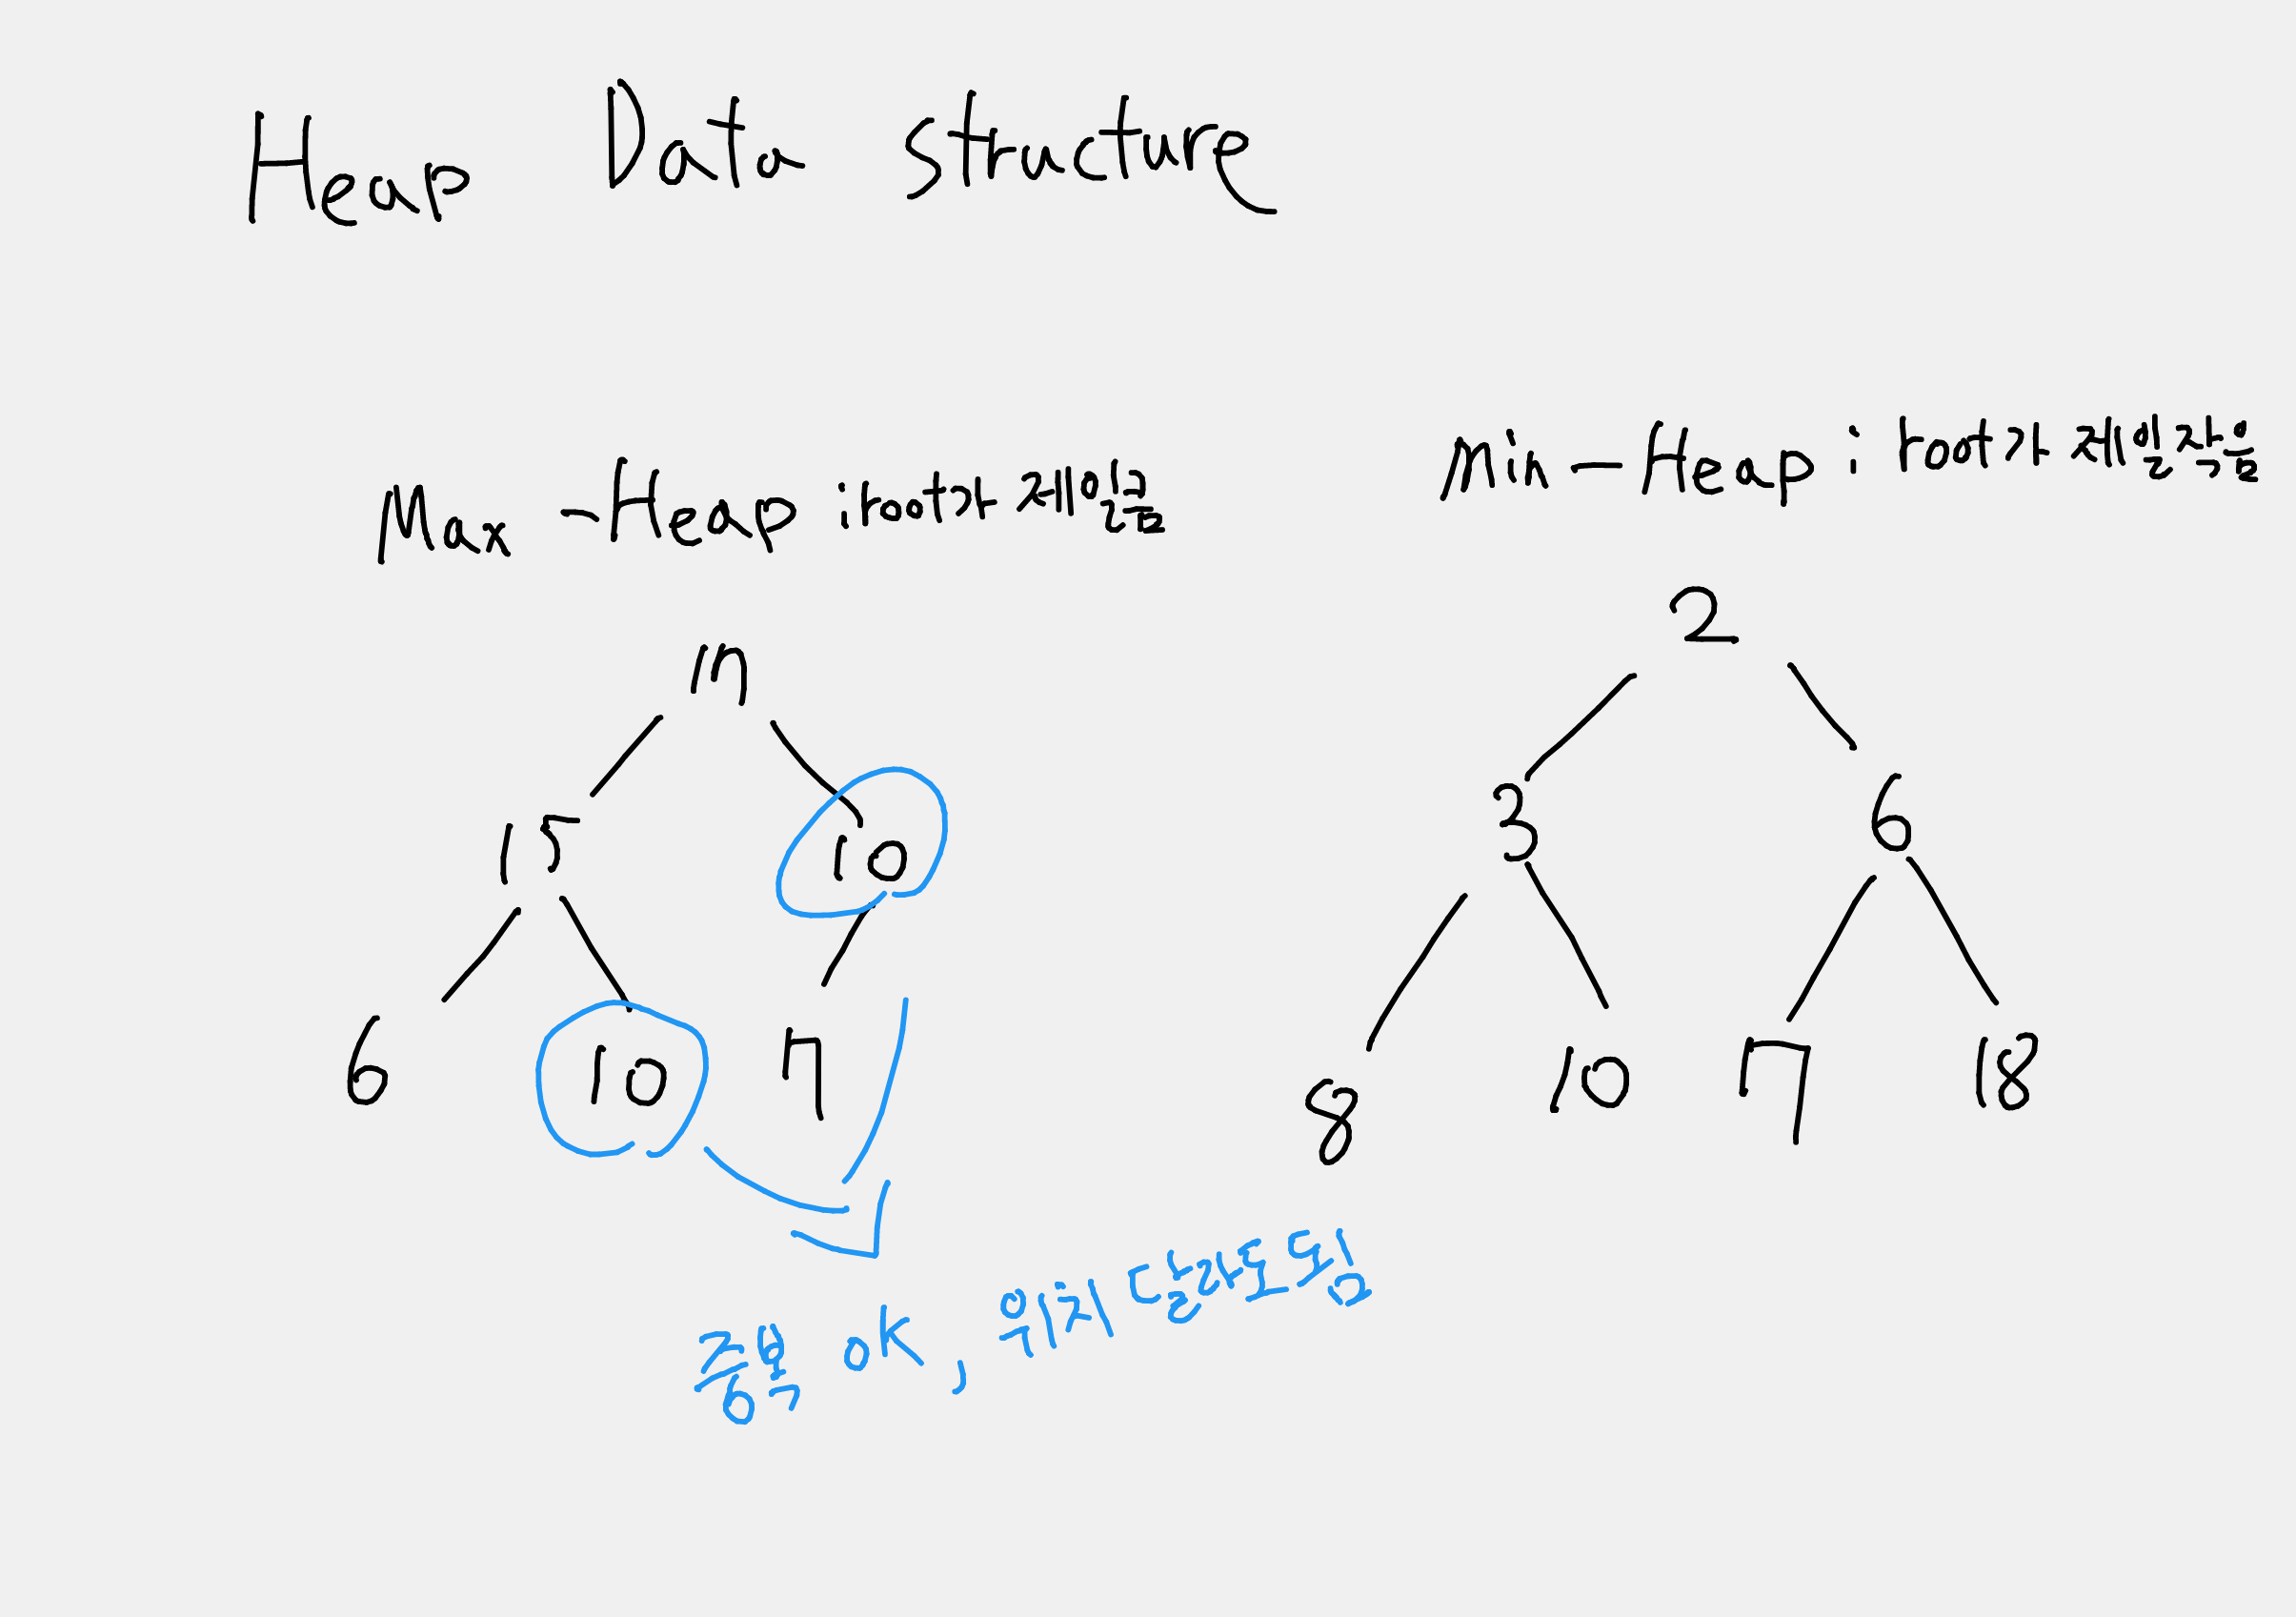
Heap(힙) 자료구조는 tree 자료구조와 비슷하며 tree의 root 값이 항상 전체 자료의 최소값 또는 최대값을 유지하는 자료구조이다.
Heap은 2가지 종류가 있는데 root가 항상 전체 자료의 최대 값인 Max-Heap과, 최소 값인 Min-Heap으로 이루어져 있다.
그림 1 - Heap 자료구조
아직까지는 최대 힙 최소 힙 사용 용도가 최대 값, 최소 값을 찾을 때 사용하는 걸로 생각되며 자식 Node가 어디의 위치에 있던 중요하지 않은 것 같다.
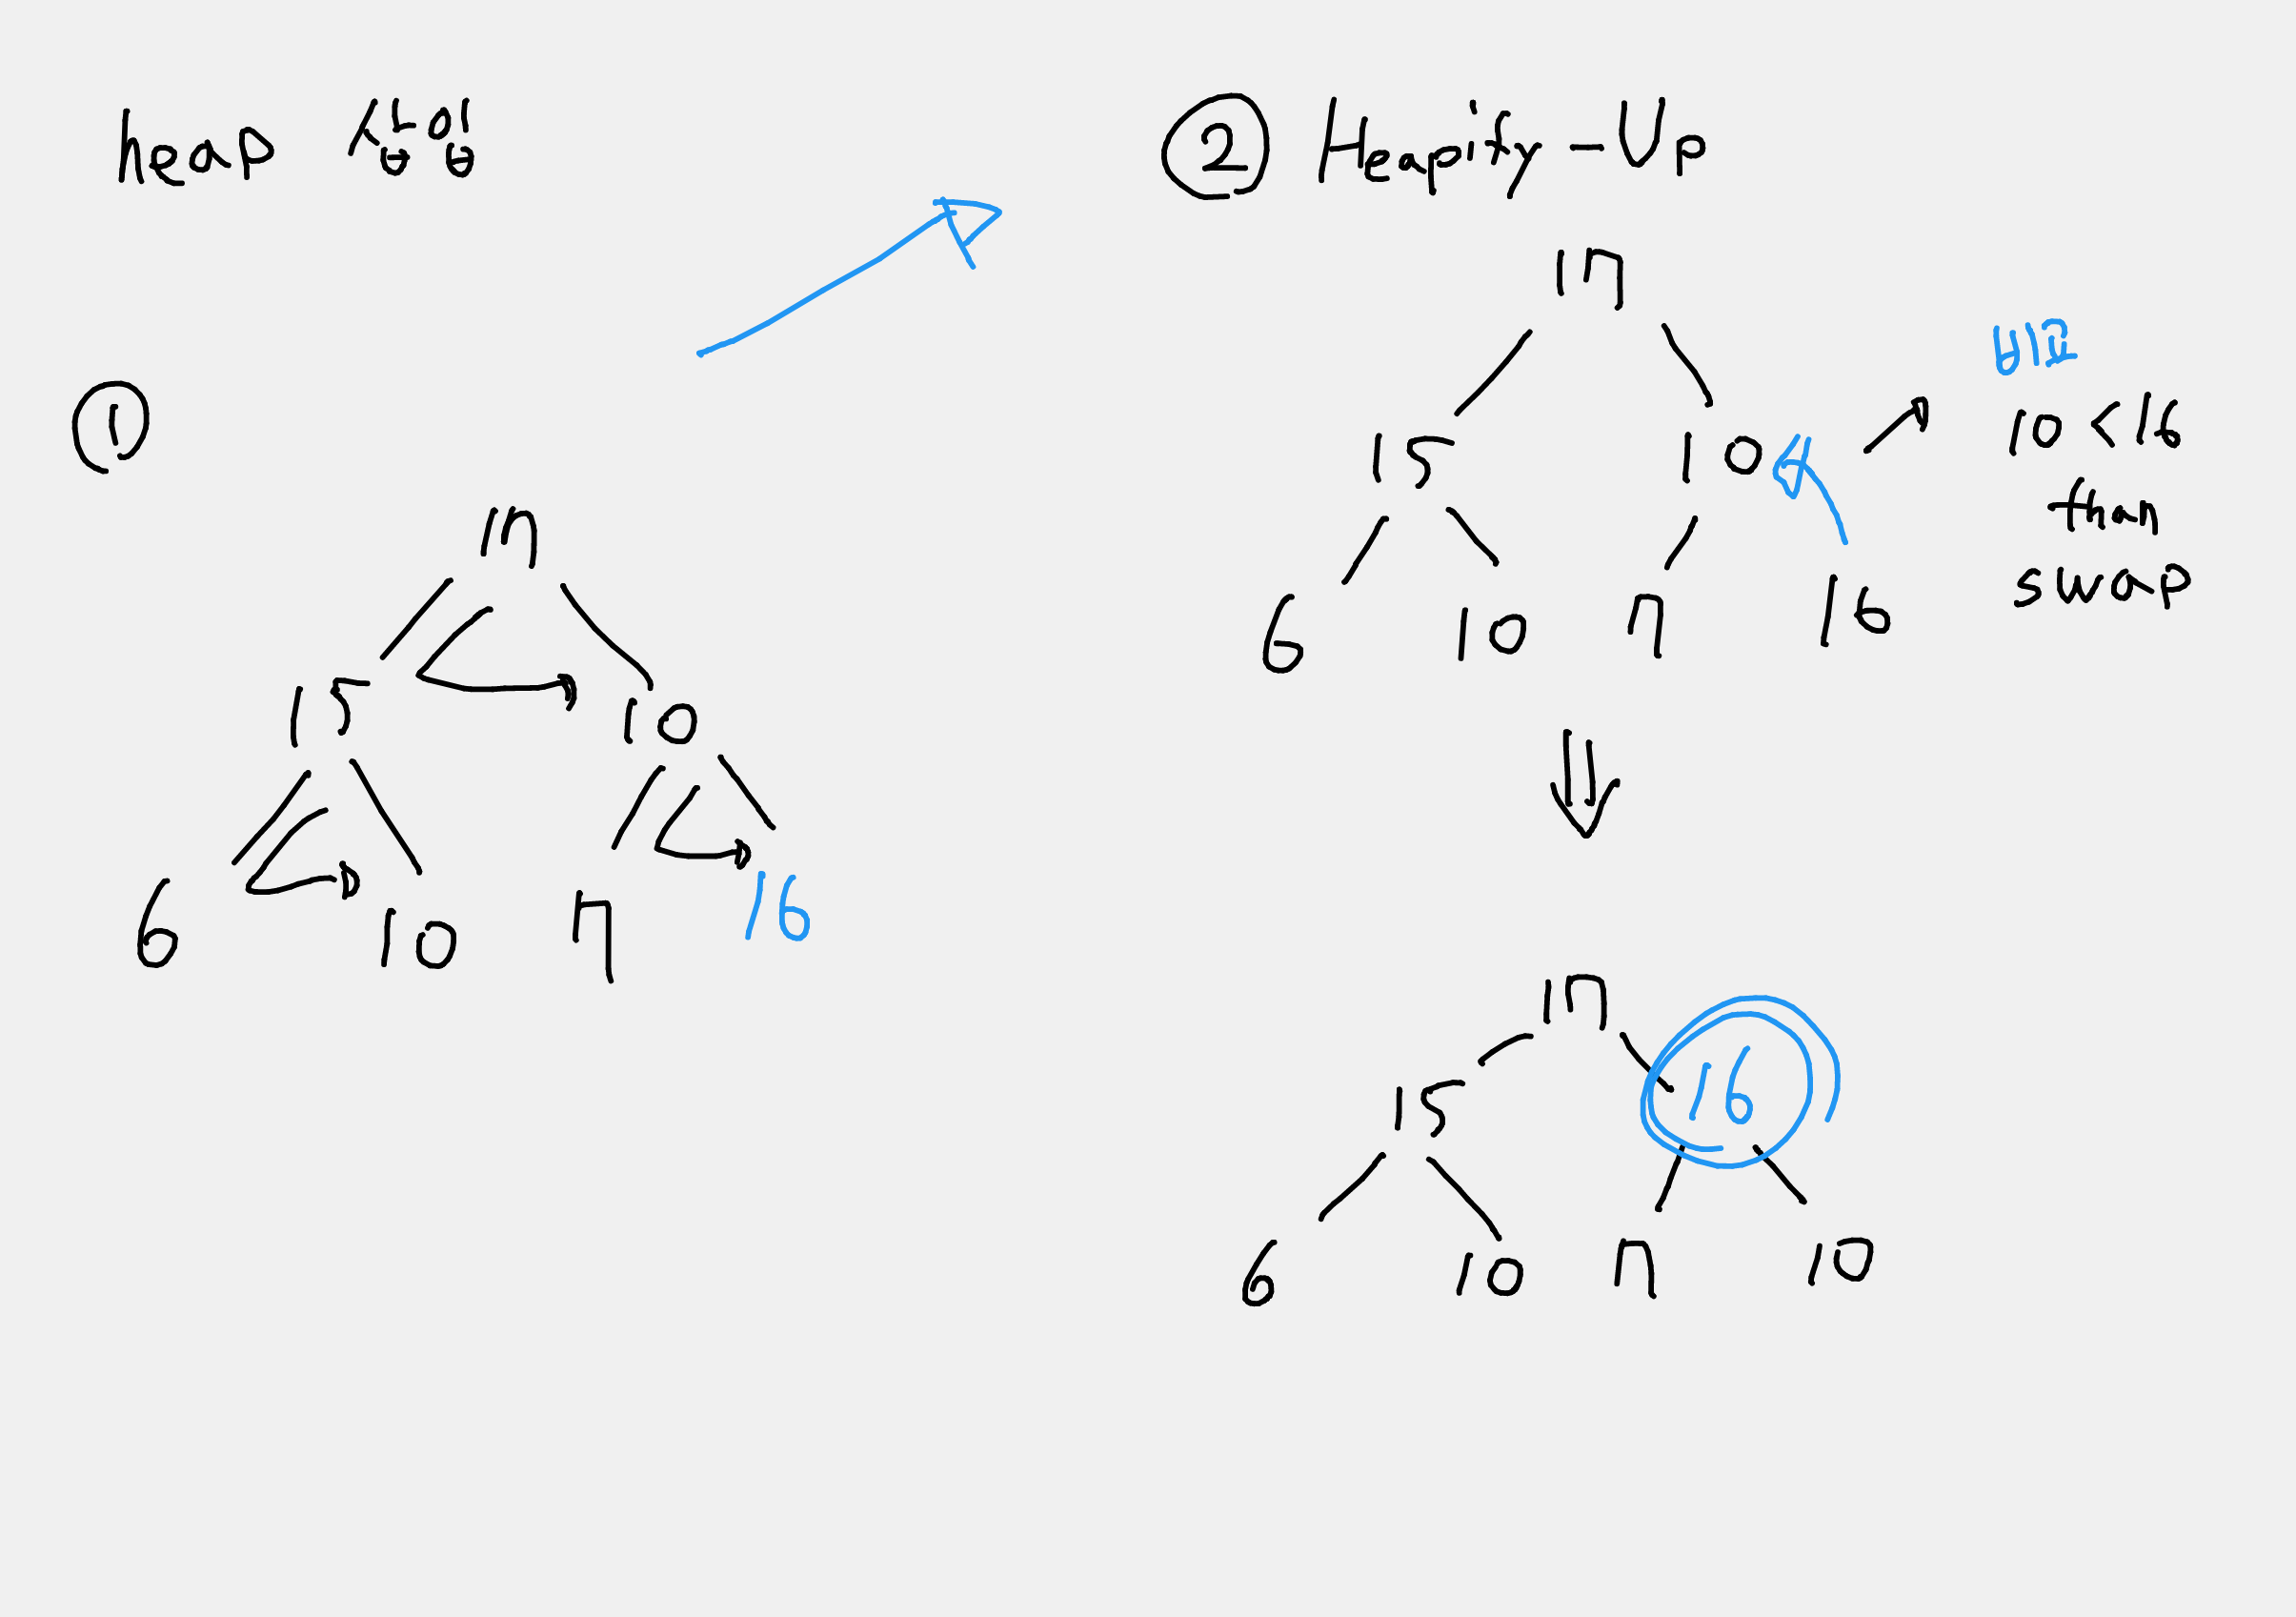
Heap 자료 삽입
Heap에 자료를 넣을 때는 Max-Heap, Min-Heap에 따라 동작하는 행동에 차이가 있으나, 동작하는 순서는 크게 다르지 않다.
Heap에 자료를 넣을 때 아래의 순서대로 동작하게 된다.
Heap 자료 삽입
1. tree의 끝에(왼쪽부터 오른쪽 탐색) 자료를 넣는다.

2. Heapify-Up 알고리즘을 통해 Heap 자료구조를 정렬한다.
Heapify-UP 알고리즘은 자신의 부모 Node와 비교하며 Max-Heap 일 경우, 부모 Node 보다 크면 자신과 부모의 위치를 변경하고, Min-Heap 일 경우, 반대로 부모 Node보다 작으면 자신과 부모의 Node를 변경한다.
아래의 예제는 Max-Heap의 자료 삽입을 예시이다.
그림 2 - Heap 자료 삽입
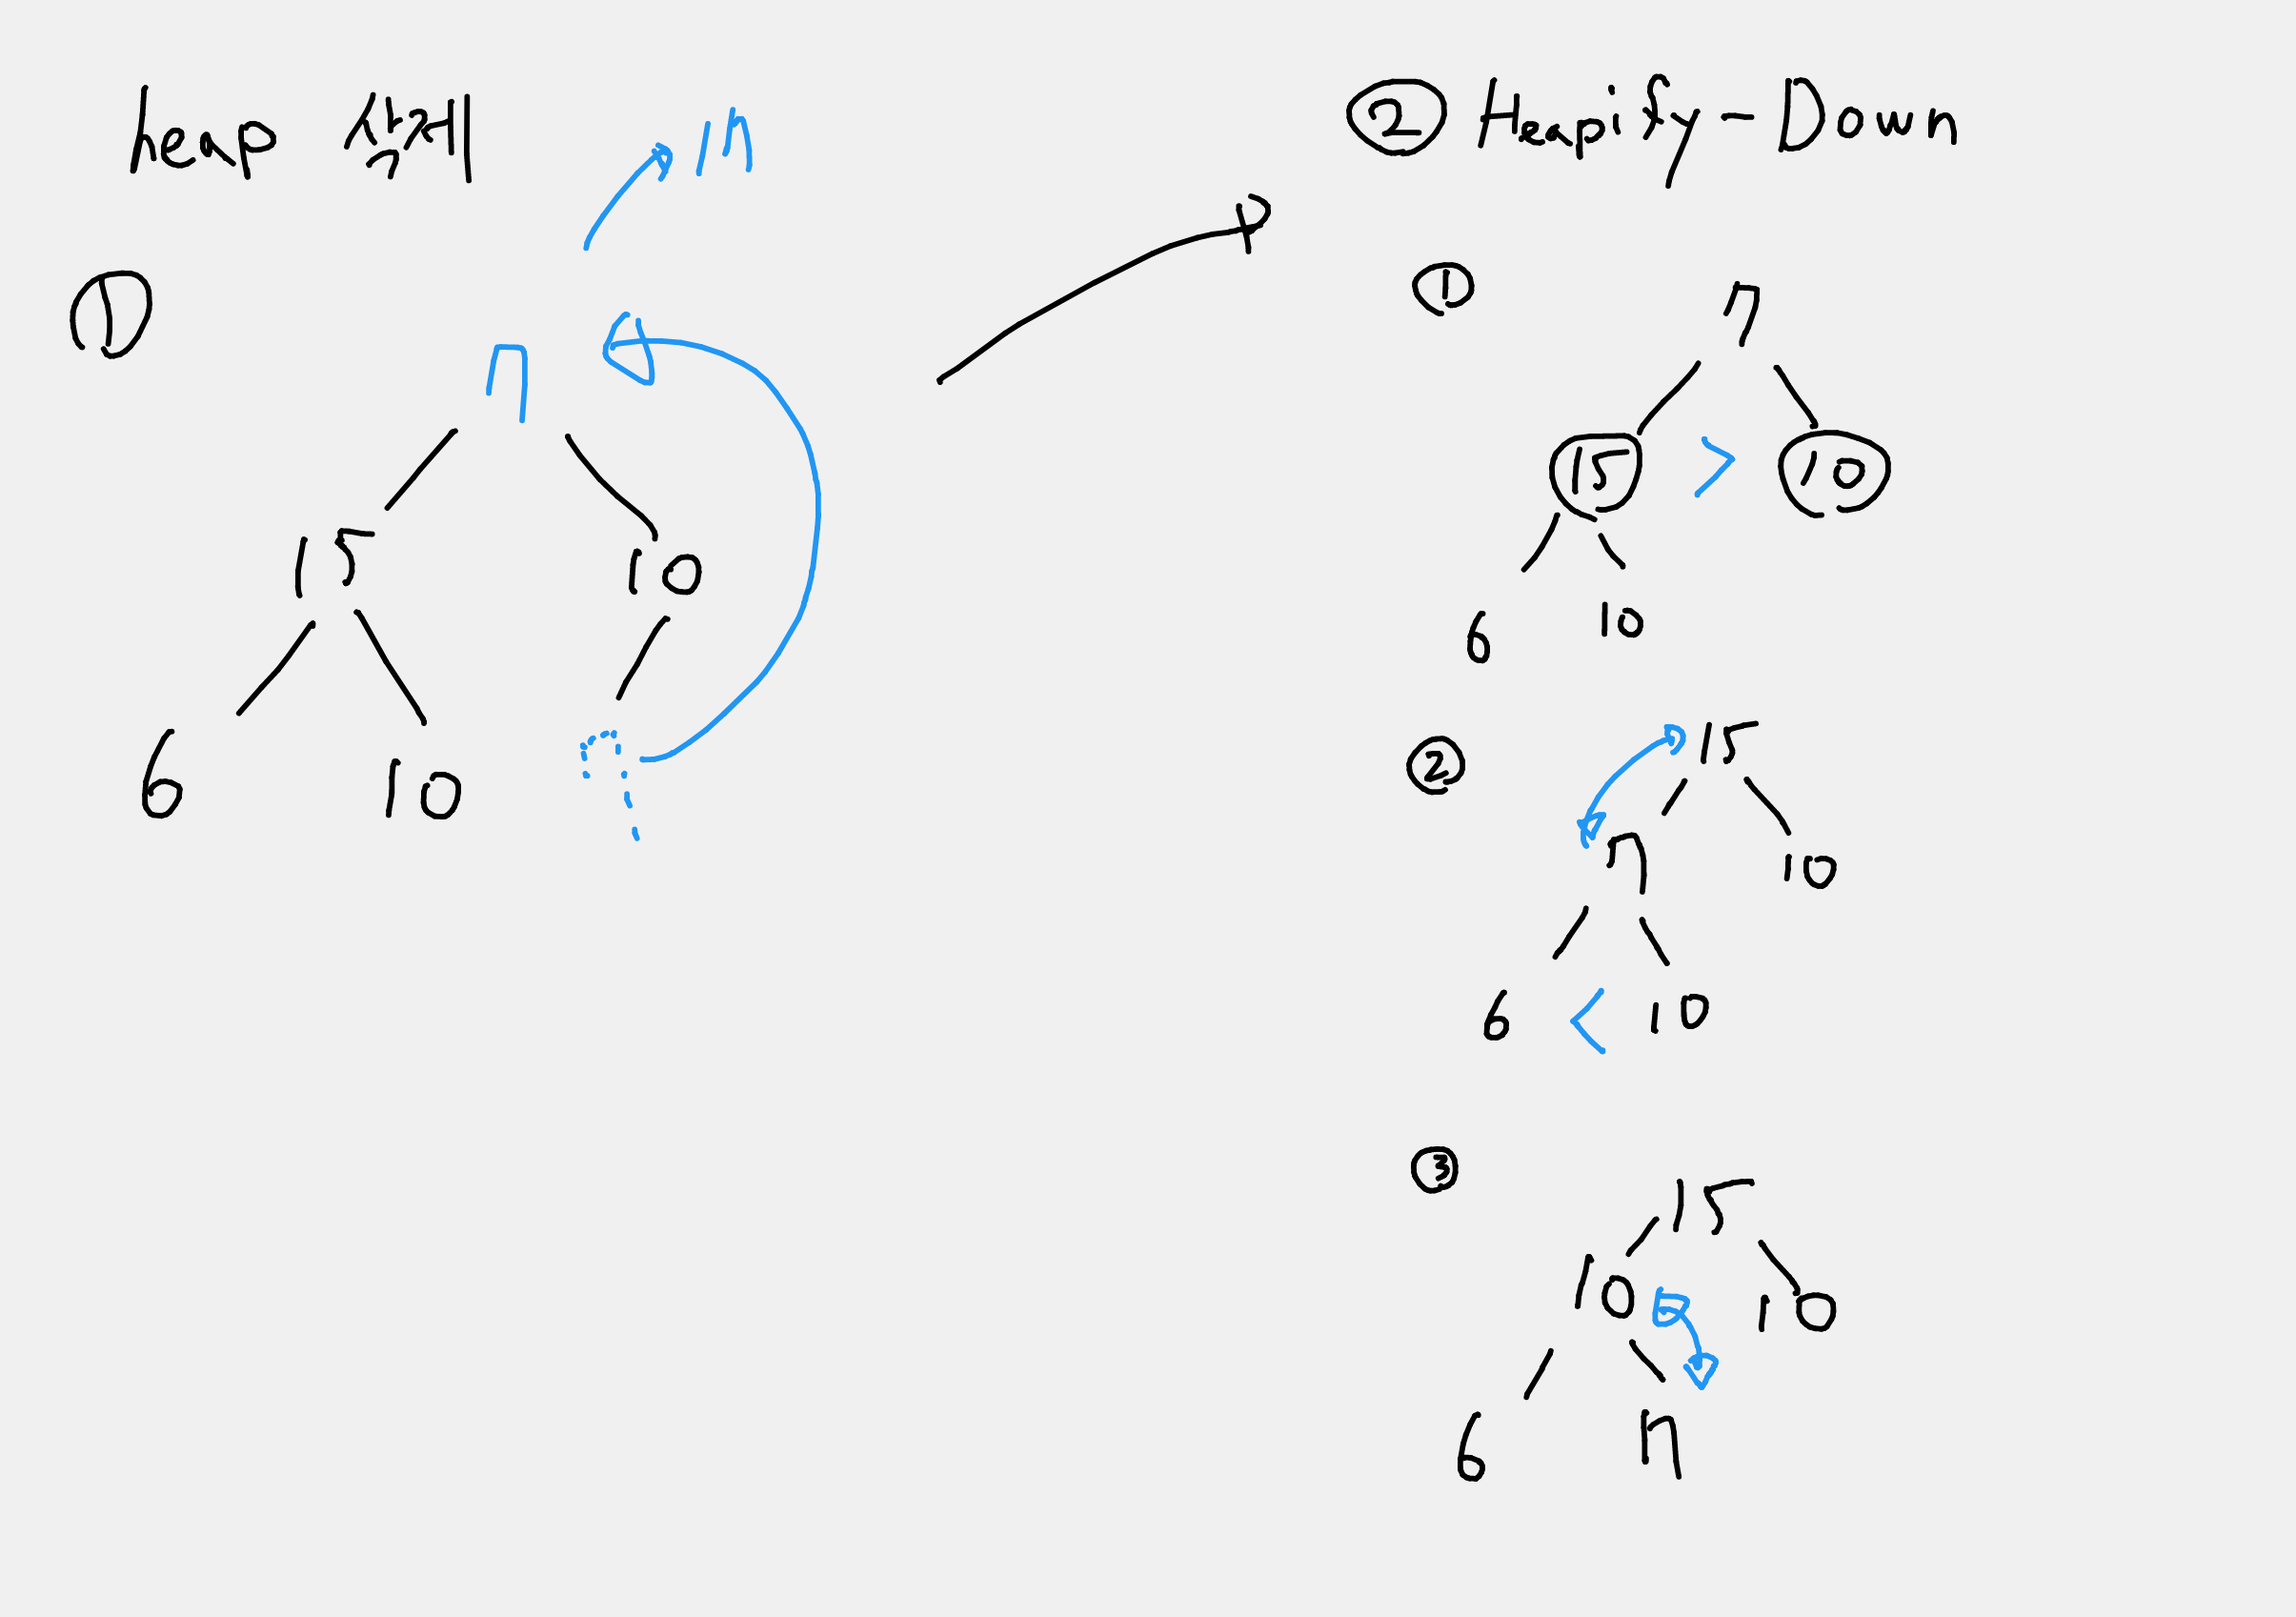
Heap 자료 삭제
Heap 자료를 삭제할 경우에는 크게 Root Node를 삭제하거나, 특정 Node를 검색하여 삭제하는 것이 있다. 마찬가지로 Heap에 종류에 따라 순서가 크게 다르지 않다.
Heap에 자료를 삭제할 때 아래의 순서로 동작하게 된다.
Heap 자료 삭제
1. 제일 끝에 있는 Node가 삭제된 위치로 옮기고, 데이터를 삭제한다.

2. 삭제된 위치에서 Heapify-Down 알고리즘을 통해 Heap 자료구조를 정렬한다.
Heapify-Down 알고리즘은 삭제된 위치에서부터 두 자식 Node를 비교하며 Max-Heap 일 경우, 두 자식Node 중 큰 Node와 부모 노드와 한번 더 비교하고, Min-Heap일 경우 두 자식 중 작은 Node와 부모 노드와 비교하여 크거나 작을 경우, 위치를 서로 바꾼다.
아래의 예제는 Min-Heap에서의 root 노드 삭제 동작을 예시로 들었다.
그림 3 - Heap 자료 삭제
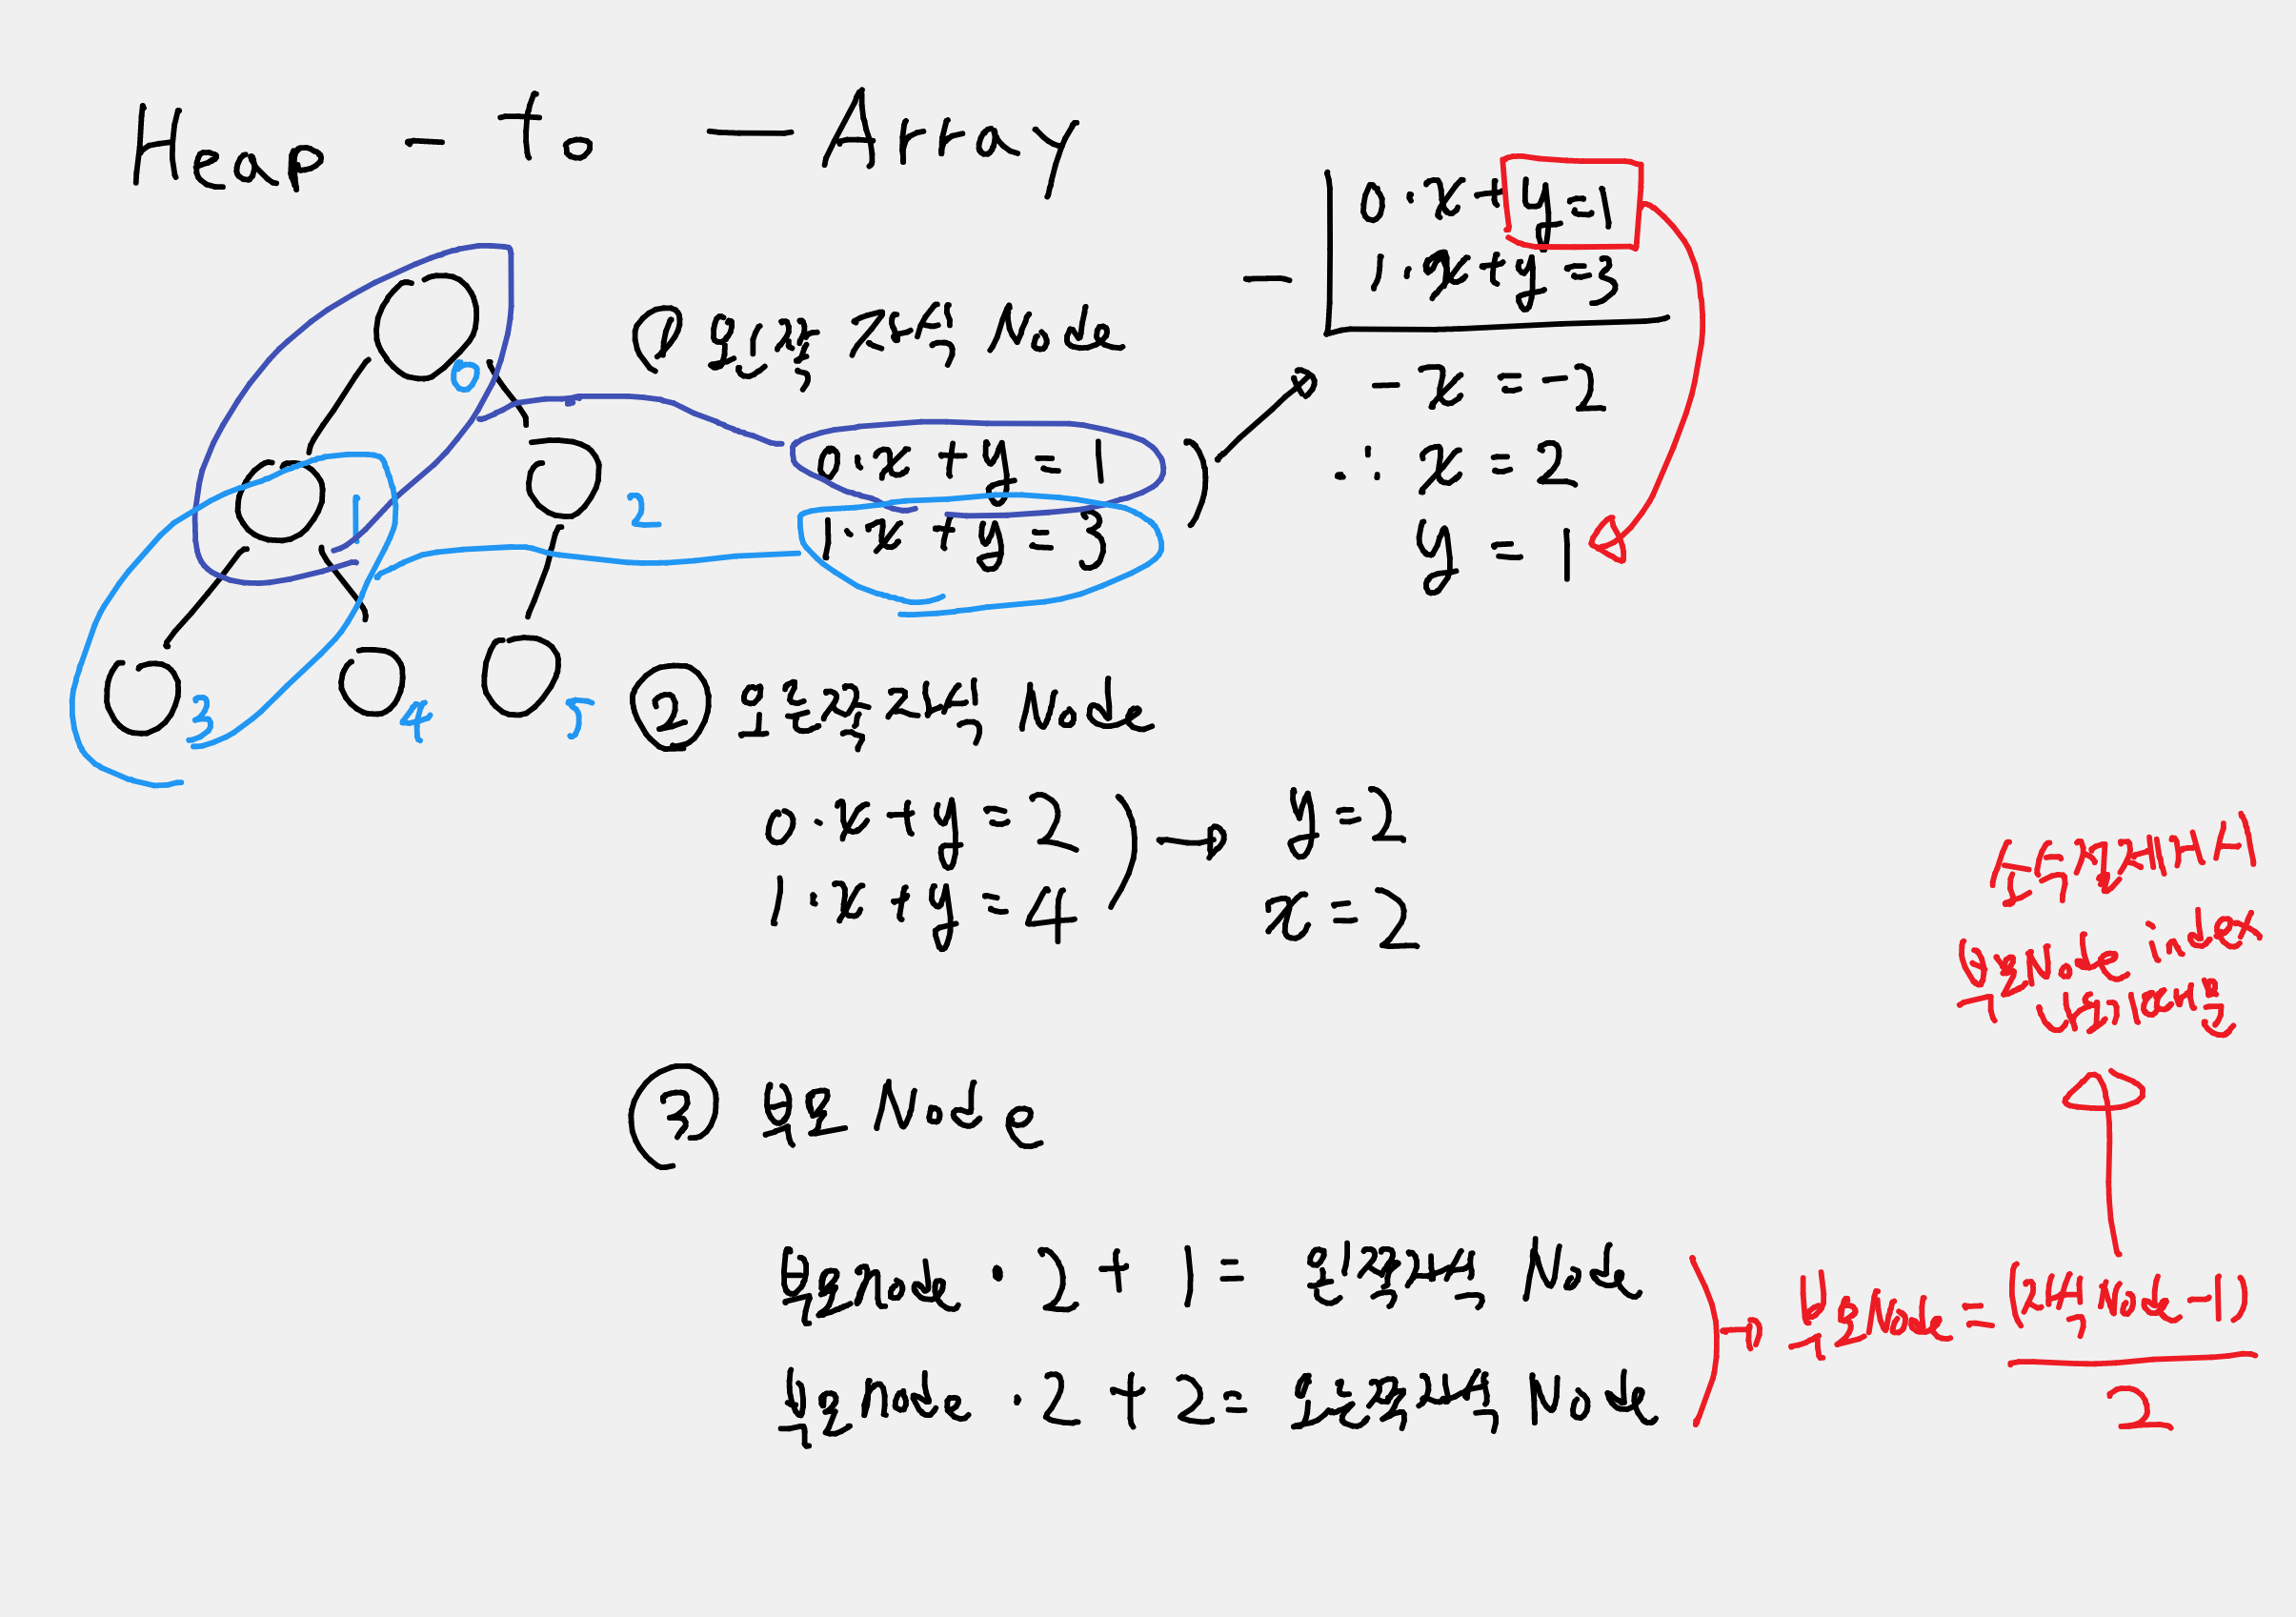
Heap 구현
배열을 활용한 Heap 구현
Heap은 부모와 자식 Node로 구성되어 있고, 아래와 같이 배열로 표현이 가능하다.
그림 4 - Heap의 배열 표현
부모 및 자식 Node로 접근할 때 아래의 공식을 사용하면 된다.
부모 및 자식 Node index
현재 index에서 부모 Node index 값 = (index - 1) / 2
현재 index에서 왼쪽 자식 Node index 값 = (index * 2) + 1
현재 index에서 오른쪽 자식 Node index 값 = (index * 2) + 2
증명 방법은 아래와 같이 연립 방정식 을 이용하였으며, 특히 부모 Node를 구할때는 index가 1일때를 고려하여 왼쪽 Node에서 얻은 식을 바탕으로 구한다. 왜냐하면 index는 소수점이 의미가 없기 때문이다.
그림 5 - index를 구하는 과정
이게 수학과, 기술의 큰 차이인 것 같다.
코드 작성
아래는 Heap을 python 코드로 작성한 결과이다. 먼저 각 데이터에 접근하는 Method를 구현하였다.
classHeap():def__init__(self):self.size=0# heap의 사이즈 계산self.heap=[]# 실제 데이터가 저장되는 공간# Index를 구하는 MethoddefgetParentIndex(self,index):returnint((index-1)/2)defgetLeftChildIndex(self,index):returnint((index*2)+1)defgetRightChildIndex(self,index):returnint((index*2)+2)# 자식 Node를 확인하는 MethoddefhasLeftChild(self,index):returnTrueifself.getLeftChildIndex(index)<self.sizeelseFalsedefhasRightChild(self,index):returnTrueifself.getRightChildIndex(index)<self.sizeelseFalse# Heap의 값을 구하는 MethoddefgetParent(self,index):returnself.heap[self.getParentIndex(index)]defgetLeftChild(self,index):returnself.heap[self.getLeftChildIndex(index)]defgetRightChild(self,index):returnself.heap[self.getRightChildIndex(index)]# (.. 중략 ..)
1. 데이터 삽입 구현
Heap의 데이터 삽입 부분이다. 데이터를 전부 삽입 한 후, HeapifyUp 메소드를 통해 정렬하는 것을 주목하자.
defremove(self,value):target_index=-1# 데이터 탐색forindexinrange(self.size):ifvalue==self.heap[index]:target_index=indexbreakself.swap(target_index,self.size-1)# 제일 뒤에 있는 데이터와 변경delself.heap[self.size-1]# 원래 있는 데이터 삭제self.size-=1# Size 감소self.heapifyDown()# Heapify-Down 정렬 실행
3. Heapify-Up 구현
Heapify-Up은 해당 index에서 root를 Max-Heap, Min-Heap에 따라 비교한 후 값을 교체하는 작업을 진행한다.
defswap(self,index_a,index_b):self.heap[index_a],self.heap[index_b]=self.heap[index_b],self.heap[index_a]defheapifyUp(self):index=self.size-1whileself.getParent(index)>self.heap[index]:# 더이상 비교할 수 없으면 종료self.swap(self.getParentIndex(index),index)index=self.getParentIndex(index)
4. Heapify-Down 구현
Heapify-Down은 해당 index에서 Max-Heap, Min-Heap에 따라 비교 오른쪽과 왼쪽 자식 Node를 먼저 비교하고 마지막에 해당 index를 비교한다.
왼쪽 자식 Node가 있는지 확인 한 후, 오른쪽 Node를 비교한 후 마지막에 해당 index를 비교하는 것에 주목하자.
defswap(self,index_a,index_b):self.heap[index_a],self.heap[index_b]=self.heap[index_b],self.heap[index_a]defheapifyDown(self):index=0whileself.hasLeftChild(index):# 왼쪽 Node 비교smallChildIndex=self.getLeftChildIndex(index)ifself.hasRightChild(index)andself.heap[smallChildIndex]>self.getRightChild(index):# 오른쪽 Node 비교smallChildIndex=self.getRightChildIndex(index)ifself.heap[index]<self.heap[smallChildIndex]:# 해당 Node 비교breakelse:self.swap(index,smallChildIndex)index=smallChildIndex
QHEAP1 문제 개요
아래의 연산을 지원하는 컴퓨터가 있다고 한다. 각 번호는 연산 번호인데, 번호마다 다음과 같은 동작을 수행한다.
연산자 종류
type 1 - Heap에 뒤에 따라오는 값을 저장한다.
type 2 - Heap에 뒤에 따라오는 값을 삭제한다.
type 3 - Heap에 들어있는 최소값을 출력 한다.
연산 리스트를 아래와 같이 주어졌을 때, type 3의 출력하는 결과 값을 구하는 것이 문제이다.